Valla Super-Guide: Hatred Must be Tempered by Discipline
By: EtherealBnny - 6/2/2017
Peer-Reviewed by Nihilism Gaming
|
|
|
|
Hero Introduction:
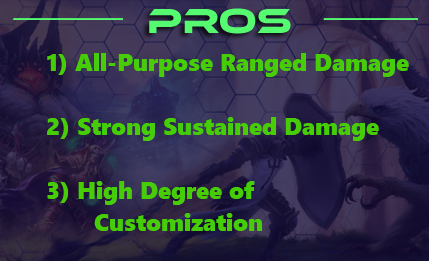
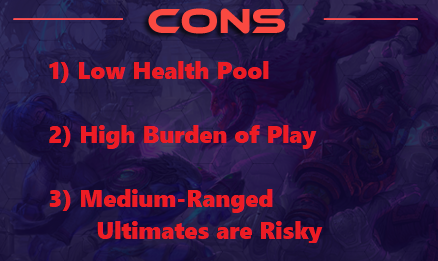
Valla is a mobile, mid-ranged, physical damage dealer who can output solid & sustained damage. She specializes into one of three damage builds depending on the situation. Valla is the the only ranged assassin with an area of effect stun. While she causes the most chaos from behind her team, with proper handling, she can also flourish independently. Between Multishot (W) and Hungering Arrow (Q) she sports good waveclear and poke which makes it really easy for her to bully whoever she's up against in lane.
|
|
Talent Choice:
Tier One - Level One
|
Recommended
|
Auto-Attack
|
Arrow
|

|
|
|
|
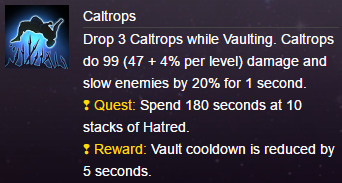
If you are opting to go for the Multishot (W) build, you're gonna have mana problems because Multishot (W) costs 75 mana and later into the build it gets cooldown reduction. This means that you will be using Multishot (W) often which will drain your mana too quickly, Hot Pursuit helps compensate for that. The bonus 10% move speed is really noteworthy, but if you wanted to better increase your mobility, Caltrops is still recommended. Note that both this and Caltrop's bonuses require you to be at 10 stacks, so make sure to maximize that by always hitting minions. Be cautious about your positioning when you do this as enemies will know that you want to keep your Hatred Stacks. One tip is to pause between your attacks so that you don't kill the minions too quickly before the next minion wave arrives.
|
Caltrops is recommended if the enemy lineup includes melee heroes that will try to chase you down (Butcher, Illidan, Sonya, etc.). This also helps remedy Vault’s (E) short range. Although Vault’s (E) distance remains unchanged, if enemies walk into the Caltrops, the 20% slow and additional damage causes the gap between you and the enemy take longer to close, and becomes more punishing.
For the Auto-Attack build, this is still recommended even without the dive-heavy comp because it reduces Vault's (E) cooldown by 5 seconds. Vault's (E) original cooldown is 10 seconds, and considering it's her only escape ability, halving its cooldown gives Valla more mobility/survivability during clashes or skirmishes. Also, the shorter cooldown enables you to use Vault (E) a bit more aggressively as compared to originally having to save Vault (E) to escape. |
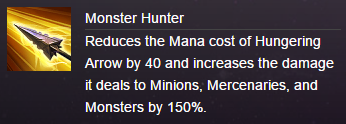
The main thing to consider when going Hungering Arrow (Q) Build is whether the map has high-hp Minion/Mercenary targets (usually Boss camps, or map objectives) so maps like Cursed Hollow, Battlefield of Eternity, or Haunted Mines (If your team wishes to rush the golems), Monster Hunter makes taking camps extremely fast especially when you're racing boss on Cursed Hollow or racing Immortals on Battlefield of Eternity. This also brings the Mana cost of Hungering Arrow (Q) from 60 to 20 mana. Allowing you to basically use it whenever you can because it won't hurt your mana.
|
Tier Two - Level Four
|
Multishot
|
Auto-Attack
|
Arrow
|
|
|
|
|
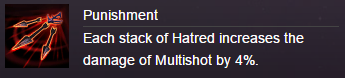
Punishment increases your total Multishot (W) damage by 40% at 10 stacks. This is exceptional considering Multishot (W) is a easy to land AoE skill with almost instant travel-time. One of the things to consider when going Multishot (W) build is if the map objective consists of many low-HP targets, or the map has high minion density (opposite to the Hungering Arrow (Q) build which required single High-HP Targets). This includes maps like Infernal Shrines, Tomb of the Spider Queen, Braxis Holdout OR when your team just needs the aoe damage (For example: to build your friendly Auriel hope).
|
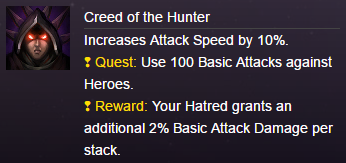
Creed of the Hunter is recommended because the 10% Attack Speed increases our main source of damage by 10%. Also, the 10% Attack Speed means you build Hatred stacks faster. Obtaining and maintaining Valla’s Hatred stacks is critically important as her normal basic attacks are weak, and the move speed bonus from Hatred reduces the risk she takes to auto-attack. After you complete your quest, it gives you an additional 20% Basic Attack Damage (2% per stack x 10 stacks). So this talent really increases the strength of your Auto-Attacks. It's also very easy to complete the quest (compared to the Puncturing Arrow Quest) because people can't dodge Auto-Attacks the same way they can hide behind minions to deny you Puncturing Arrow stacks.
|
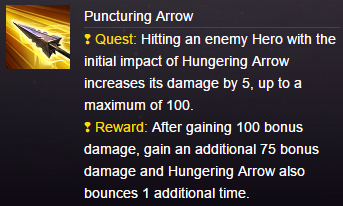
This quest is difficult because only the initial impact of Hungering Arrow (Q) counts. This means that if the Arrow bounces off a minion and then hits a Hero it will not count. Also if it bounces on the same Hero, it will not count multiple times. So this is only on the Initial impact and only adds to your quest once per Hungering Arrow (Q).
Try to complete this quest as soon as possible because the bonus damage from this synergizes with Monster Hunter from Level 1. It is easiest to build stacks against enemy tanks since their hit boxes tend to be large, and with the mana reduction, also from Monster Hunter, don't be afraid to keep throwing out Hungering Arrow (Q) on cooldown. |
Tier Three - Level Seven
|
Multishot
|
Auto-Attack
|
Arrow
|
|
|
|
|
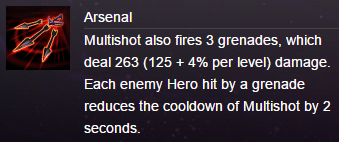
Multishot (W) Build is best when the enemy team has a heavy front-line. The reason for this is twofold: First off with many melee enemies Valla is at more risk of being a dive target. Mutilshot build means that you do not need to stay in the fight to deal significant damage, but instead you can poke in, throw skillshots and leave. Furthermore, Multishot (W) will get more value off of melee heroes as they tend to bunch up.
With Arsenal’s cool-down reduction you’ll be able to throw out Multishot (W) over and over again. Hitting many targets means you’ll be doing massive AOE damage while maintaining low risk. Learn to land all three grenades from Multishot (W) to maximize its cooldown reduction, but keep in mind that you can not hit one hero with multiple grenades. This means you want to keep a safe range, instead of moving closer to land 3 grenades on one target. |
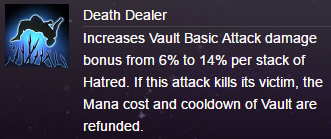
Death Dealer further increases your Auto-Attack damage after you use Vault (E). At max stacks the difference is enormous changing from 60% bonus to 140%, or 80% of an additional auto-attack. It's even better if you land the killing blow on your target, because Death Dealer instantly gives you a cooldown and mana reset. This happens relatively often as the bonus damage makes the auto after Vault (E) hurt like a bee-sting. Not many talents give a cooldown and mana reset from a kill. Try to use this to reset your Vault (E) cooldown and then use Vault (E) again to make another kill.
Paired with Caltrops at level 1, you’ll soon be doing 140% bonus damage every 5 seconds - and that is if you miss your killing blows. This is best used as Valla's finisher because people normally don't expect the sudden burst from it. Be careful when using Vault (E) offensively as if you miss your killing blow you will be left without a defensive cooldown for 5 seconds. Things to consider on how and when to properly use Vault (E) offensively are included in the tips section below. |
What's better than having one extremely strong Hungering Arrow (Q) that bounces 3 times? Having two! Double Hungering Arrows (Q) means double the fun and double the damage. Again, be wary of using Vault (E) offensively (since in this case you're using it more to reset your Hungering Arrow (Q) than for an actual escape). And play cautiously when it is on cooldown. Landing both Hungering Arrows (Q) on any DPS or Support should get them critically low (If by some miracle it doesn't kill them). This is also effective if you need single-target damage but the enemy team has lots of blinds (Which are on some popular characters at the moment with the release of Cassia and the dps build on Li Li.) .
Remember that your Hungering Arrow (Q) will bounce to nearby enemies, so look to land it on isolated targets in order to maximize your single target damage. Don't be afraid to throw these out on tanks either. It will do a big chunk of damage to them, and can bounce to the squishies that they are protecting. |
Heroic Teir - Level Ten
|
Recommended
|
Situational
|
|
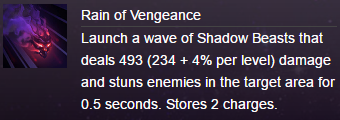
As mentioned in Valla's introduction, she's the only Ranged Assassin that has an AoE stun. Despite this being more challenging to land than Strafe (R), once you do master it, it's insanely strong. Unlike Uther’s Divine Storm or Malfurion's Twilight Dream, Valla doesn't have to be in the middle of 5 people in order to pull this off.
Rain of Vengeance (R) was designed to be used from your back-line facing towards the enemy's frontline. Don’t go out of your way to use this, instead hold it as a defensive cooldown. Even if the stun is only 0.5 seconds, it's long enough to shut down melee assassins that try to dive on you. This also does a significant amount of damage and can further punish melee assassins for hunting you down. Also, it can be used to disrupt dangerous ultimates that the other team must channel like ETC's Mosh Pit or Nazeebo's Ravenous Spirit. The animation on this is a bit clunky and delayed, so if you need to, practice it out in Try Mode just to get used to the casting animation and speed. Because the animation is a tad slow I normally aim this where I think the enemy will or must move to do damage, instead of at their current location. |
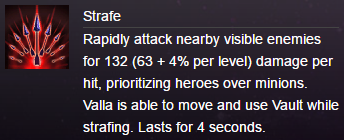
Strafe (R) has a pretty safe range compared to Rain of Vengeance (R), and is definitely easier to hit everyone on the enemy team than with Rain of Vengeance (R). However it ends up being the riskier choice for a few reasons. First of all, you lose out on an important defensive cooldown from Rain of Vengeance (R). Also, Strafe (R) is a semi-channeled ability that means if you get stunned or disrupted, then your ultimate ends. So take this when you're sure that the enemy doesn't have any interrupts like Varian's Taunt, Uther's Hammer of Justice, Brightwing's Polymorph, etc. If the enemy team does have stuns or silences, and you decide to take this, wait for them to use their interrupting abilities on other people before casting your ultimate. Strafe (R) is really good for finishing off fleeing targets without fully having to put yourself in a dangerous spot. Valla is able to use Vault (E) while Strafing in addition to being able to move, use this mobility to continuously position safely while using your ultimate.
|
Tier Five - Level Thirteen
|
Recommended
|
Situational
|
Arrow
|
|
|
|
|
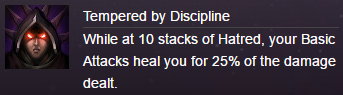
Tempered by Discipline outclasses every other talent on this tier by a mile and is appropriately your default talent. In addition to having highest winrate in the tier, Tempered by Discipline has high synergy with the auto-attack build. It helps you in both 1v1 matchups and long teamfights. It can also provide much needed attrition healing between and before engagements.
|
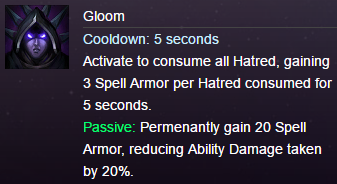
Gloom should only be taken if you are getting instantly killed over and over. The 20% spell armor passive is sometimes just enough to help you live. However, you give up a lot of power from Tempered by Discipline so carefully consider before taking this.
|
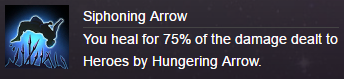
Siphoning Arrow can help give you more survivability since you are using your Vault (E) more offensively. The damage from both Hungering Arrows (Q) can actually heal you an enormous amount. This is especially useful when you are Hungering Arrow (Q) build, because it will heal you for more in a short time than tempered by discipline will. This enables you to become more aggressive for short periods as your effective health pool increases.
|
Tier Six - Level Sixteen
|
Multishot
|
Recommended
|
Situational
|
|
|
|
|
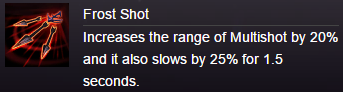
If your team needs the cc, and Rain of Vengeance (R) just doesn't seem to cut it, then Frost Shot is your next best chance. You can also use this before Rain of Vengeance (R) to make sure your ultimate lands. It increases your Multishot (W) range (which also increases the range from your grenades from Arsenal on Level 4), and the slow on this is for 1.5 seconds. This means that you can safely hit even more people with Multishot (W), and is recommended for the Multishot (W) build. If running a build that is not Multishot (W), make sure you don't need Manticore first before you take this . (Why slow people down when you can kill them?)
|
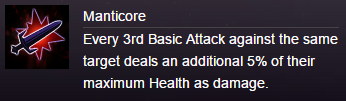
Percentage in terms of max HP damage in general is really scary for tanks. Manticore helps make Valla into the well-rounded damage dealer that you need. Manticore is especially useful if enemy characters have really high HP,. Such as Chen, Azmodan, Cho'Gall, or Muradin.
Manticore has more damage output than the other talents on this tier if conditions are perfect and you get to keep landing your Manticore on the same person. It also has a higher max damage potential, and is amazing in long and slow engagements. So when deciding between this over Seething Hatred, try to think back if you had any issues focusing one person during clashes. If you're sure you can really get the value out from Manticore, then go for it. |
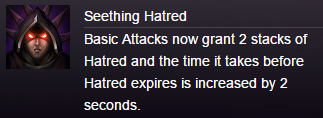
The Talents on 16 are really more up to personal preference. Seething Hatred is what I recommend the most for the AA Build because getting those stacks to 10 in half the time it would normally take you helps cover for one of Valla's main weaknesses (which is having to position riskily to build and hold 10 stacks of Hatred). And getting 10 stacks earlier in the fight could even outdamage Manticore in certain situations. If by the 5th hit, you already have 10 stacks. then your 6 - 10th hit is already you doing +100% basic attack damage, compared to Manticore still slowly climbing from that 6 - 10th hit. (Not to forget about your other bonuses from getting 10 stacks of Hatred like Punishment on Level 4 which increases Multishot (W) damage per stack of Hatred, or Death Dealer from Level 7.) Manticore only gets value from you hitting the same person at least 3 times, which is a theoretical best-cast and rarely happens perfectly every time. Seething Hatred gets you value no matter who you hit.
|
Storm Tier - Level Twenty
|
Recommended

|
Situational
|
Situational
|
Situational
|
|
Farflight Quiver is my go-to on 20 because the increased range gives you more survivability (since you can stand further back). You can also do more damage since enemies have to walk farther to get out of your Attack Range. Especially in the late game where one clash could be the last clash, you definitely want to make sure you don't die. This is especially helpful when using aggressive Vaults (E), as the increased autoattack range makes them significantly less risky. Another benefit to Farflight Quiver is that it allows you to pick targets more efficiently, as it increases your range by an incredible 40%.
|
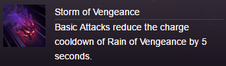
If you've decided you'll be raining Multishots (W) on enemies with the Multishot (W) build, why not add even more cc? You'll basically just be alternating between Multishot (W) and Rain of Vengeance (R) and any auto-attacks in between will keep your Rain of Vengeance (R) on a pretty short cooldown. On its own, Rain of Vengeance (R) has a 50 second cooldown, so you only need ~9 Basic Attacks to have it fully reset (not 10 because it takes a few seconds to do 9 autoattacks, all while your ultimate is cooling down normally). Note that the cooldowns are for each charge, and they're not simultaneous (Unlike Genji's Shurikens or Zarya's 20 upgrade on her Particle Grenades)
|
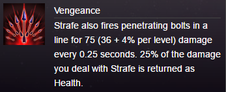
Vengeance can be good to pump up the damage output of Strafe (R). I generally like this talent when the enemy team has few interupts and when I'm playing either Multishot or Arrow build. This is because I can drop my cooldowns and immediately Strafe (R) in for massive AOE damage. The healing is a nice secondary effect which makes using Strafe (R) less risky in general.
|
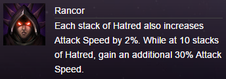
Although Rancor would work well with Seething Hatred because you get to 10 stacks faster, it has even more significant benefits when paired with Manticore. If you feel at little to no risk of death with your current build, this will allow you to pump your max damage output even higher. Like Manticore, this is especially great in slow and sustained fights. Therefore the combination of Rancor and Manticore often ends up being better than Rancor and Seething Hatred. However, often you’ll find that the reduced risk from Farflight Quiver is better, because your max damage output is high enough without Rancor.
|
Ability Analysis:

Hatred is what makes Valla stronger (and weaker) than other ranged auto-attack Assassins. Stronger because once she gets to 10 stacks,.she has high damage compared to the average assassin. So before any skirmishes or clashes, if you can, try to keep your Hatred stacks at 10. You can do this by hitting anything - from enemy Walls/Gates, to minions, to summoned units like Gazlowe's turrets (as long as you switch to the proper targets once the clash starts) Hatred lasts 6 seconds so it's a bit more forgiving compared to Greymane's Inner Beast which only lasts for 3 seconds.
Hungering Arrow (Q) is a single target poke ability. It does decent damage especially if all bounces land on the same enemy. You can use it to check bushes. Hungering Arrow (Q) strictly hits whoever it hits first, however, its other bounces are a bit more random but have a maximum range. This means landing a Hungering Arrow (Q) on isolated targets will cause the bounces to also hit that target. The area of it is pretty small, and its projectile speed is a bit slow, so getting used to its range might take practice. During a clash, throw it out as often as you can to pressure whichever target you need to. This is on a pretty short cooldown, and you're not really gonna be saving it for anything else.

Multishot (W) is an AoE ability. It doesn't do as much damage for poke compared to Hungering Arrow (Q), but you get more value from it if you hit multiple enemies (E.g. The enemy Hero you're laning against AND the entire minion wave) Also use this as often as you can during a clash and at the same time look to maximize the number of enemies you hit with it. If you are Multishot (W) build, it is okay to hold Multishot (W) at the start of a fight while waiting for a opportunity to hit more targets. This is because its damage scales up with your level 4 talent: Punishment. Also, if you are Multishot (W) build, hold this to land at least two out of three grenades - generally look to hit at least two enemies in a large teamfight, and three if you’ve taken Frost Shots. Like all AOE spells this easily reveals stealthed units which can help to keep you safe. It has a deceptively long range, and has almost instant travel time, so don't be afraid to try to cast it as a last resort to finish someone off who barely made it away with 10 HP.
Early Game:
You should be dishing out as much damage as possible. Valla has very strong Early Game kill potential with finishing moves like Hungering Arrow (Q) or Vault (E). There are two reasons for this: she is not as reliant on her talents for power as other heroes are, and because of this, enemies have a hard time killing her in the early game. If you can’t make takedowns, make sure to be pressuring your lane or bullying whoever you're up against. Valla performs well in the lanes, especially when teammates are around. Whether the enemy is Sylvanas, Zagara, Sonya, Azmodan, whoever! Just keep track of their dangerous skills, make sure to dodge them, and once they are down, re-engage on them and use your own skills.
Valla has the option to specialize into stronger AOE skills, or stronger single target skills. Look to take advantage of an enemy’s weakness by choosing to win your early lane by clearing the minions faster, or killing or the enemy hero. For example, if you're against a Kael'thas who has just as good waveclear as you, and unlimited poke with Verdant Spheres into Living Bomb, clear the wave as fast as you can, throw out a Hungering Arrow (Q) to him for free, or if not, trade with him and squeeze out more damage by using Vault (E) offensively (while dodging Flamestrike. Because it only takes a few steps to dodge it. So dodge it!) With this match-up, you out-damage him during trades because you have 3 skills that do damage, and he only has 1 (You dodged flamestrike, remember?)
Valla has the option to specialize into stronger AOE skills, or stronger single target skills. Look to take advantage of an enemy’s weakness by choosing to win your early lane by clearing the minions faster, or killing or the enemy hero. For example, if you're against a Kael'thas who has just as good waveclear as you, and unlimited poke with Verdant Spheres into Living Bomb, clear the wave as fast as you can, throw out a Hungering Arrow (Q) to him for free, or if not, trade with him and squeeze out more damage by using Vault (E) offensively (while dodging Flamestrike. Because it only takes a few steps to dodge it. So dodge it!) With this match-up, you out-damage him during trades because you have 3 skills that do damage, and he only has 1 (You dodged flamestrike, remember?)
Mid Game:
Help out your team. Around this time is when people start to group up, but some maps like Dragon Shire or Warhead Junction, people are still gonna be split up, so be careful. It's always safe to stick with your team just in case. Valla gets her skirmishing spike on 13 with the lifesteal from Siphoning Arrow or Tempered By Discipline. Use your powerful damage to force enemies away from teammates and to follow your warrior player into the fray. Try to coordinate your ultimate with your teammates for maximum effect. Also be on the lookout for enemy ults that you need to be cancelling with your Rain of Vengeance (R).
On target prioritization, it's
1. People you can safely hit
2. Ults or any tiny annoying units that no one else can focus such as Anub'arak's Cocoon, Raynor's Raiders, Kerrigan's Ultralisk, Jaina's Water Elemental, Tychus' Laser, Nazeebo's Gargantuan, Zagara's Hydralisks (Hunter Killer), whichever is being annoying to you or your fellow dps or support.
3. Immobile Squishies (whether it's a Support or Assassin. No point focusing a Lúcio or Zeratul if they can just disengage and then re engage.)
3. Enemy Supports (Cut their lifeline!)
4. Enemy DPS (up to you to decide who's doing the most damage to your team from their team. Check score board or something!)
5. Lastly tanks. The reason why you save tanks for last is because of their High HP, and it's possible that you'll never be able to kill them if their supports are still alive. They usually do the least damage anyway. The ones that do a lot of damage Bruisers don't have that much HP and sometimes fall under Enemy DPS (Like Sonya or Zarya)
Late Game:
You should be with your team! Clash with them!
If there could only be 2 things I can say regarding playing Valla, it's
1. Surviving > doing damage.
2. Always be doing safe damage.
So to explain that a bit more, I do tend to play as aggressively as I can (No, I don't go 1v5,) but I try to test to the extremes how far I can go kite someone before I'm in any serious danger. Because you'll never be able to see those tiny windows of opportunity to kill a support or enemy DPS if you just play safe the whole match (yes those windows open during clash. You just have to get used to looking for them / seeing them). I still do emphasize that survival > doing damage, but if you want to step up your Valla game, you have to find those clutch moments! Anyway if you die, you'll know that you can kick it down a notch, and keep experimenting til you find that perfect balance (which is always changing because the better you get at finding those opportunities, the more opportunities open up for you. xD)
Tips & Tricks:
- Always stay at or around your max Attack Range. No reason for you to be up close or within arms reach to scary melee assassins like Alarak, Thrall, Butcher, Kerrigan, etc.
- If their comp was really made to dive on you, don't be afraid to ask help from your team (Nicely!). "Guys, Illidan keeps using The Hunt on me. Can we please focus him the moment he does that?" :) We can't always depend on our team though, that's why I like taking Caltrops.
- Also in the above scenario, when you hear "YOU ARE NOT PREPARED" don't panic Vault (E) out. Just wait for him to hit you, and then be prepared to Vault (E) away. (Unless you're near your team's gate, then by all means Vault (E) into your Fort/Keep range.) He's gonna stun you regardless of whether you Vault (E) first or not. The difference is, if you just let him hit you, you can still Vault (E) away. If you panic Vault (E), he hits you, and now you have no Vault (E). :( The same applies to Butcher or sometimes Diablo if see him casting his Shadow Charge on you.
- You can also use your Rain of Vengeance (R) to help you fight these divers. They have pretty low HP and stunning them could help get rid of them.
- Stick to your team, but be careful of clumping up. There are lost of dangerous AoE (Area of Effect) ults that would instantly kill you or bring you to critical health if you got caught in it. Examples: Graviton Surge, Entomb, Ring of Frost, Grav-O-Bomb 3000
- Get in the habit of dodging Skillshots! This takes practice and experience but it also goes with knowing your enemies' talents and abilities.
- Strafe (R) has a range indicator on what your range is.
- Practice those Stutter-steps! There are tons of tutorials on Youtube. A.k.a. Kiting, Orb-walking, Animation-Cancelling
- HP estimation is really helpful (whether your damage or enemy damage). People new to MOBAs don't really get this practiced or pay attention to this, but if you come from League of Legends or DotA, you know this is a must if ever you want to earn gold from minions. This comes in handy to let you know how much damage you need to do to be able to go in, secure a kill, and then get out. Think of it like predicting the future just from one exchange. This will be very important for you to know which fights to pick, and when to run away.
- Know the difference when you should be stutter stepping or actually running away. Much of the issues I see with most Vallas is that they usually run away when they should be stutter stepping, or stutter step when they should be running away.
- Be more aware of the attention your enemies give you. For example, if you and an ally are running away, and you see the enemy Heroes are chasing your ally, this is when you wanna be stutter stepping because that might still turn the fight around. Even when they're chasing you, and you Vault (E) away, the moment they turn around and give up chasing you, you should try to throw in a few more hits. (Of course with proper judgement)
Conclusion:
Valla might be a bit mechanically demanding compared to the other auto-attack heroes like Raynor or Tychus, but she's really rewarding if you do pull her off. Her strength relies in your mastery of changing up your play-style to adapt to the enemy comp, and what type of damage would be best to deal with them (AoE or single-target). Consider this and decide early as you should be able to know the optimal build by seeing the team compositions at the start of the game. Like all the other assassins, you want to find the perfect balance between doing as much damage as you can while managing to survive.
My final advice is: (almost) ALWAYS. BE. STUTTER. STEPPING.
My final advice is: (almost) ALWAYS. BE. STUTTER. STEPPING.
Want to learn more?
Try out our Heroes of the Storm Coaching Lessons!