Johanna Super-Guide: The Crusade Marches On
By: rRase - 4/24/2017
rRase is a long-time grandmaster in Heroes of the Storm. He has various competitive experiences as a player, coach and analyst. He is currently the team captain, main drafter and shot-caller of the University of Ontario Institute of Technology/Durham College Varsity Heroes of the Dorm team (Ro64).
Hero Introduction:
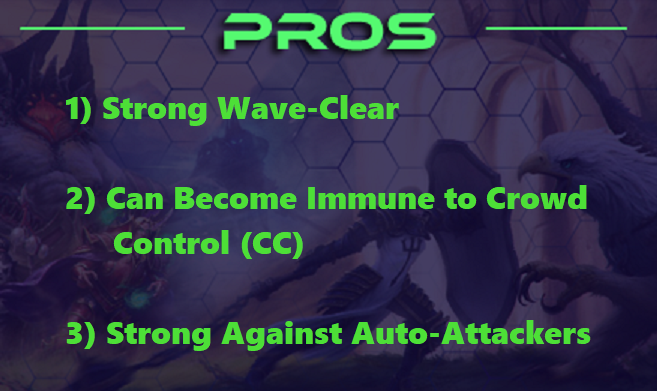
Johanna is a solo-tank warrior in Heroes of the Storm. She is exceptionally durable against auto-attack based heroes due to her having 25 physical armor and a blind ability in her base kit. She provides plenty of waveclear, and due to that she is a great pick on small, rotation-based, maps such as Tomb of the Spider Queen or Dragon Shire.
|
|
Talent Choice:
Tier One - Level One
Recommended
Recommended

|
Regeneration Master is a strong option that increases Johanna’s health regeneration and when completed, gives her a large amount of extra health. This quest is rather difficult to complete, so you rarely get value out of the reward portion. The exception is when you are constantly rotating and clearing waves to gather regen globes. This happens often when you have a good map for it such as Tomb of the Spider Queen, Braxxis Holdout or Dragon Shire. In most situations this talent will outperform Reinforce due to the health regeneration granting a larger amount of effective health than Reinforce.
|
Situational
|
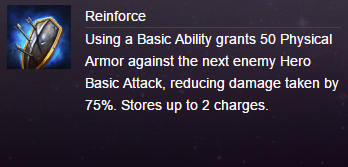
Reinforce is only strong against auto-attackers. Due to Johanna usually being picked as a counter to auto-attackers, this almost always gets value unless you are against a Tracer, Zarya, Tassadar, or any heroes with extremely high attack speed who can quickly remove its effect. If the enemy team has many slow and heavy auto-attackers, such as Ragnaros and Thrall, this will provide a greater benefit than Regeneration Master.
|
Tier Two - Level Four
Recommended
Recommended
|
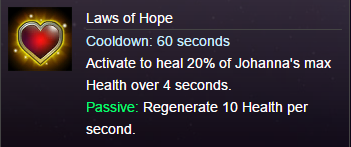
Laws of Hope Is a strong defensive talent that serves to increase Johanna’s passive health regeneration. In addition to this powerful effect, it also allows her to heal for 20% of her base health through its activatable effect. This makes Johanna very hard to kill as she gains a second defensive cooldown (along with her trait) and further health regeneration. As a tank Johanna needs to be able to stand in the front and this achieves that goal nicely, without giving up too much utility from other picks in the tier.
|
Situational
|
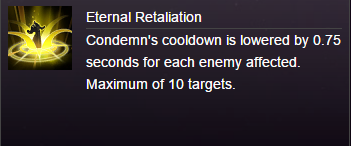
Eternal Retaliation is good for clearing objectives on maps like Infernal Shrines and Braxxis Holdout, and full-fledged team-fights. When deciding if you want this talent consider these things: Will you be able to live? How many minions are there? If you can answer both in favor of this talent (I will live easily and there are many minions) take this talent.
|
Tier Three - Level Seven
Recommended
Recommended
|
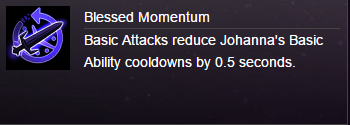
Blessed Momentum is exceptional because it lets you use your abilities more often allowing you to consistently disable your enemies and dish out more damage. The combination of damage and control provided by this talent is unrivaled by any other on the tier, making it a top choice for many pro players. However, it can be a drain on your mana so take this into consideration when making your choice.
|
Situational
|
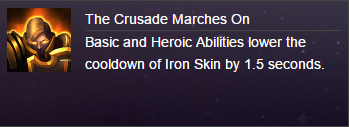
The Crusade Marches On is another good option that competes with Blessed Momentum. This is a trade-off that allows you to have your trait up more often, thus increasing survivability and mobility. Since Johanna gains an enormous amount of survivability from her level one and four talents, this is often unnecessary, and the poor value compared to Blessed Momentum often makes this a worse choice. But if you’re the focus of the enemy team becoming harder to kill is important to winning the game.
|
Situational
|
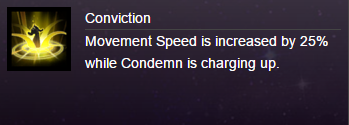
Conviction is useful if your play-style is naturally aggressive, or you need a tool to quickly approach the enemy backline. One example of good use would be to take Conviction in order to prevent an Orb-Build Li-Ming from getting Triumvirate (her level 4 talent) resets. Overall this talent brings relatively good utility, but it comes at the high cost of giving up Blessed Momentum.
|
Heroic Teir - Level Ten
Recommended
Recommended
|
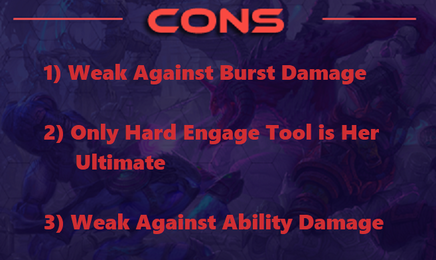
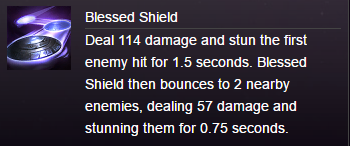
Blessed Shield is the go-to ultimate for Johanna because it is a great engage tool. In fact, it helps to mitigate an enormous weakness in her kit. Because Johanna has few options for stuns and movement speed, this becomes her best engage mechanism. Also, the projectile moves quickly, allows follow up, and is harder to dodge than Falling Sword (R).
|
Situational
|
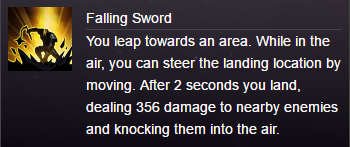
Falling Sword is also good when you have other ways to engage a teamfight on your team. For example, since you have a Kerrigan on your team, there is less of a need to take your own engage ability. Furthermore it sports an incredibly high amount of burst damage, which allows you to basically insta-kill a squishy enemy if they fail to dodge your ult, followed by the rest of your kit. However be careful, since you can easily separate yourself from your team and die. One main weakness of this ultimate, and why it is often avoided, is its enormous ‘cast time’. Johanna must forcibly remove herself from the fight for two seconds in order to use Falling Sword (R). Because of this, it's often used to secure an extra kill in a fight that is already won, used as an escape mechanism, or used to engage (and trust me, that Valla still has her vault up to dodge it). Because of its normal uses, it normally has little impact on helping to win the teamfight in the first place, where Blessed Shield (R) often will.
|
Tier Five - Level Thirteen
Recommended
Recommended
|
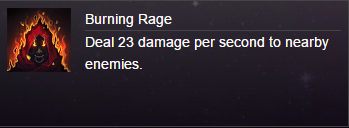
Burning Rage is my go-to almost every match due to it’s strong damage over time. It allows you to just deal a lot of hidden damage to enemies in a team-fight. I like to think of it as a reverse version of regeneration master (23 damage/second & AOE). Burning Rage is a powerful talent on its own and even more so on Johanna since in synergizes well with her kit. Using her basic abilities, Johanna pulls enemies towards her and slows them which gives her massive value out of Burning Rage.
|
Situational
|
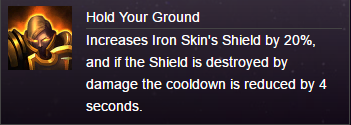
Hold Your Ground is great if you find you are getting blown up too easily. Paired with Level 7’s The Crusade Marches On (grants cool-down reduction to your trait), you can frequently get your shield off cool-down and use it to get out of sticky situations. Because Johanna normally takes talents earlier in the game to grant her survivability, you often will not need this one. If you find yourself taking it often, you may want to check your positioning.
|
Tier Six - Level Sixteen
Recommended
Recommended
|
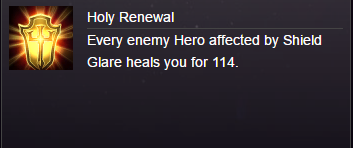
Holy Renewal is fantastic choice on Johanna because it allows her to stay healthy in fights. This talent performs consistently well, even during pre-team-fight poking because you can heal off the chunks of damage that you’ve taken. Along with the massive amount that this talent heals, Johanna has base physical armor that makes that health recovered even more effective.
|
Situational
|
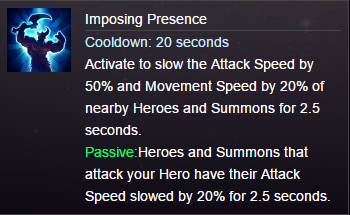
Imposing Presence is really strong against auto attack heroes and it helps if you want to stick to targets easier. This is because enemies will often try to stutter-step away from you. Due to its move-speed slow, this means enemies must choose between dealing damage to you or running away as doing both is no longer viable. Imposing presence also helps out your team by slowing the damage output of your enemies. Take this talent to assist your allies in living longer during team-fights.
|
Situational
|
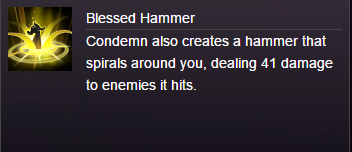
Blessed Hammer is the best pick in the tier when you team races to 16 and is feeling strong. If you don’t feel that you need Holy Renewal to save yourself, or Imposing Presence to save your allies, Blessed Hammer brings a small amount of AOE damage to your team-fight. This is the best talent choice when you anticipate little value from the other talents on this tier.
|
Storm Tier - Level Twenty
Recommended
Recommended
|
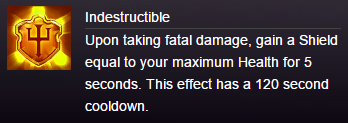
Indestructible is really strong, since it makes you nearly un-killable for 5 seconds. This means 5 more seconds of damage, 5 more seconds of your healer granting you life, and the ability to absorb an enormous amount of damage that could be aimed at your teammates. There are very few situations where this talent is a bad choice.
|
Situational

|
Storm Shield can also be decent if your allies are getting killed too quickly or when you are always the last to die. This means that Indestructible will get less value and Storm Shield is the better pick. A perfectly timed Storm Shield on a low health ally can save a teamfight, so keep that in mind when choosing your Storm talent.
|
Ability Analysis:

Punish is a short range, AOE ability. Because it does only a small amount of damage, its main function is usually as a follow up after you pull enemies in with Condemn (W). Executing this small combo makes it so that enemies have more trouble getting away from you. You can also use it after using Condemn (W) to clear a wave of minions. Even though it only does a small amount of damage, it is worth the mana and cool-down if you can hit many targets. Take extra care when using Punish (Q) to hit as many targets as possible..

Condemn is the main ability in Johanna’s kit. It is your waveclear, set-up, and crowd-control. Without this ability Johanna would be useless. Use this on squishy enemies by first using your mount to close as much distance between yourself and the enemy. Then, pull them towards you with Condemn (W), devastate them with Punish (Q), and let your teammates finish enemies off. You should also and you use it to clear waves due to it’s passive that deals bonus damage to minions.

Shield Glare should always be used on the enemy who has the most dangerous auto-attacks. It will cripple an enemy hero’s damage for 1.5 seconds. Because it is a short effect, try to hit your enemies when they most desperately want to deal damage. Since Shield Glare (E) is an AOE effect it can be used to significantly influence a teamfight. In addition to hitting the most dangerous enemy auto-attacker, aim to hit as many others as possible: even weak auto-attacks missed means less damage coming towards your team.

Iron Skin is a very important ability, and is much more than just a damage sponge. You can use it to get to the enemy backline without getting cc’d to death, you can use it to walk into a Mosh-Pit and Condemn (W) to interrupt it, you can use it to escape death while running away, and so on. It is often best used near the start of a team-fight, but only after you take a little damage. This is because of Johanna’s natural strength of regenerating her health over time through Regeneration Master at level one, and Laws of Hope at level four. If Johanna has full health when she uses Iron Skin (D), she receives no benefit from either talent.
Early Game:
There are a few different common setups you can use with Johanna. Since she has great wave-clear, you’ll want to try and rotate between two nearby lanes. However, this isn’t possible on some maps and in that case you’ll want to work on clearing just one lane. Wave-clear is your specialty. Remember that Johanna is a utility warrior, and not a gank-oriented one. She isn’t meant to get kills early on, she just soaks and wave-clears. Johanna’s general wave-clear combo is Condemn (W) to Punish (Q). At the same time, use Shield Glare (E) on your opponents so they deal less damage to you as you approach the minions.
Mid Game:
In the mid game, Johanna takes the standard main tank position for her team. This means she should stand out in front in order to control the majority of the enemy heroes. Johanna is also responsible for choosing when to fight, and starting the engagement. More often than not, you will use your ultimate of choice to begin a fight. Be careful with Falling Sword (R), since you may go in too far for your team to help you. Blessed Shield (R) can be used to catch an enemy out of position and blow them up. At level 13 when you get Burning Rage, you will start to deal a lot of team-fight damage. This means you can play even more aggressively as enemies will no longer be able to simply ignore you.
Late Game:
Later on in the game, Johanna starts to get even tankier and this means that you can comfortably sit on the enemy's backline heroes such as Valla. Johanna shines the most at level 20, when she gets Indestructible, allowing her to stay in the fight nearly forever. In your team-fights, attempt to control and disrupt enemy heroes in order to prevent them from doing their jobs. Johanna’s unique combination of self-regeneration and damage over time means that longer team-fights put you in a favorable position.
Tips & Tricks:
- Wave-clearing is very important on Johanna, her quick waveclear on Condemn (W) allows your team to get ahead in experience.
- Use Condemn (W) to pull enemies towards you and follow up with Punish’s (Q) slow. This allows your team to follow up for some good damage or even a kill.
- Always use Shield Glare (E) to blind the highest auto-attack damage threat, it will make or break a teamfight.
- It’s important to peel for your assassins as well. If your team has a particularly fragile ranged assassin, such as Valla, make sure the enemy divers aren't giving her a hard time. You can do this by using Shield Glare (E) and Condemn (W)
- Be careful if you decide to take Falling Sword (R), as its high mobility could leave you far from your teammates.
- Iron Skin (D) grants you Unstoppable, meaning you cannot be affected by crowd-control.
- Use Iron Skin (D) to prevent enemy stuns and slows from leaving you in a bad position.
Conclusion:
Johanna is a utility based warrior that focuses on getting her team ahead in terms of minion experience and disrupting her enemies and peeling her allies. She isn’t a ganking queen, but she really can tear up a team-fight if left unchecked. Condemn (W) and Shield Glare (E) are very strong abilities when used correctly, so make sure to use them wisely!
Want to learn more?
Try out our Heroes of the Storm Coaching Lessons!