Abathur Super-Guide: Fear Appropriate
By: FreezeBug - 7/2/2017
Peer-Reviewed by Nihilism Gaming
Hero Introduction:
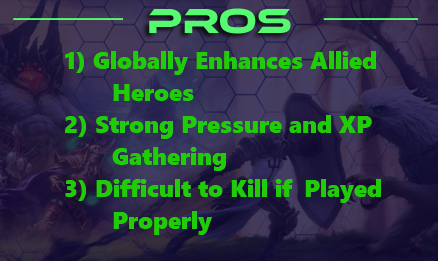
Abathur is an incredibly unique specialist hero who acts primarily through other heroes to provide them with extra damage and a small boost to their defensive capacity.. Simultaneously, Abathur provides global map pressure through his Toxic Nests, Locusts Strain, and ability to “body soak” while still being present in fights. His advantages are somewhat offset by his abysmal health pool and overall reliance on his team (both compositionally and their positioning), but in the right circumstances, Abathur is able to completely take over a game while being far from the action.
Abathur has two viable builds and one “for fun” build (which will be mentioned in an ability footnote later). What build you take is largely determined by the composition of your team, as the “Hat Build” focuses specifically on augmenting a certain type of hero, while the “Mine Build” is more universally applicable but lacks some of the teamfight punch of the hat build. Abathur’s playstyle also favors larger maps, as the larger the map, the more safely he can apply his global pressure and the harder he can make it for the enemy team to rotate with his mines.
Abathur has two viable builds and one “for fun” build (which will be mentioned in an ability footnote later). What build you take is largely determined by the composition of your team, as the “Hat Build” focuses specifically on augmenting a certain type of hero, while the “Mine Build” is more universally applicable but lacks some of the teamfight punch of the hat build. Abathur’s playstyle also favors larger maps, as the larger the map, the more safely he can apply his global pressure and the harder he can make it for the enemy team to rotate with his mines.
|

|
Talent Choice:
Tier One - Level One
|
Hat Build
|
Mine Build
|
Hat Situational
|
Mine Situational
|
|
|
|
|
|
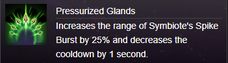
This talent is a favorite for the hat build due in part to its synergy with talents we’ll be taking later in the game. The cooldown reduction and range increase makes your Spike Burst (W) damage more consistent. Since the hat build enhances allied heroes in the thick of the enemy team, being able to hit more heroes more often with your only source of AoE damage will drastically increase your damage output in the long run.
|
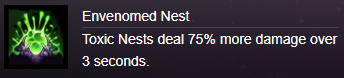
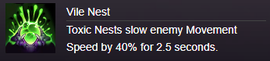
As the only mine talent in the tier this is usually what you end up with when taking the mine build. The goal of the mine build is to restrict movement by having your enemies hit multiple mines on the way to objectives or during rotations. Envenomed Nests make rotations even more punishing and after two or three Envenomed Nests, a fair few assassins start having to consider whether or not they’ll be showing up to their destination with enough health to contribute without ending up dead. Keep in mind that the DoT effect from this talent will not stack, so spread out your mines.
|
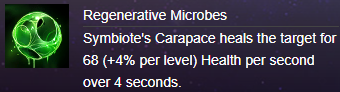
I feel you can usually bypass this talent in favor of Pressurized Glands on the Hat Build, since improving your Spike Burst (W) at this tier allows you to increase the effectiveness of a later sustain talent while providing more teamfight damage. The healing here is pretty low, but you can apply it to minions to aid pushes in your downtime, and sometimes the added healing combined with the sustain talent for your Spike Burst (W) can make your Symbiote target unassailable. Pick this if you think you’ll get an appreciable benefit out of it, otherwise stick to Pressurized Glands. Keep in mind that the healing stops if the shield is consumed.
|
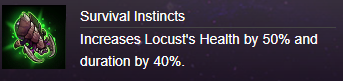
Have to be honest, this is a talent that shined back in the good old days of HotS, but one that has been dropped out of the meta builds in favor of Envenomed Nest in recent years, so I haven’t played with it in a while. This talent makes your Locusts have more staying power, and that can lead to faster ammo drain on towers and more effective pushes. You give up a decent chunk of damage by going for this though, and forgoing Envenomed Nest can affect your waveclear for a small boost in sustained siege. It might be just personal preference, but I would usually stick to Envenomed Nest.
|
Tier Two - Level Four
|
Hat Build
|
Mine - Large Map
|
Mine - Small Map
|
Hat Sitational
|

|
|

|
|
|
This talent is the reason to take the Hat Build. The 25% attack speed from this talent is what turns your typical auto-attacker hat target into a monster, particularly if said target has survivability tied to their auto-attack damage or output (see: Butcher, War Paint Sonya, or the perennial favorite, Illidan). Nothing else on the talent tier really benefits the Hat Build much anyway, but it would be a hard sell to choose anything else even if there was other options present.
|
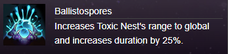
This talent gives your mines global range and increased duration, which is useful for a few reasons. First, it allows Abathur to block chokes or mine minion waves from anywhere on the map, while still maintaining nice, safe, body soak locations away from the fight. The increased duration also ultimately allows you to have quite a few more chokes covered at a time, so you can take time in between objectives to mine routes to the objective that will spawn without worrying about the mine lifespan. A final small point that’s useful for late game is that, since mines provide the vision necessary for your mount, Deep Tunnel, to function, this greatly increases your global mobility even as the map starts to go dark in the late game. There are also two quirky uses for this talent, first off the global mines let you scout mercenary camps and most importantly - bosses. Also, late in the game you can use this to burrow behind an enemy keep (where it can not shoot you) and drop your locusts to deal significant damage to the keep. However, this tactic is not recommended as you can normally put your locust to better use. If you end up on a map where you can reach the majority of lanes from your top or bottom fort with your default mine cast range, however, you might find that Prolific Dispersal outperforms this talent due to the added charges.
|
Though Abathur’s use on small maps is typically a result of playing the Hat Build, if you end up needing to take a Mine Build, this talent can outperform Ballistospores due to the added charges. The added charges and reduced cooldown allow you to place mines more often, covering an increased number of chokes every time you exit Symbiote albeit in a more predictable area (smart enemies can spot your Locusts and infer what half of the map you’re mining). You can also make use of the increased charge count to quickly place several mines all in one area to create a powerful, invisible trap along predicted rotation routes, which can sometimes secure kills, healing fountain use, or backs if not properly scouted by the enemy team. This can be used on larger maps as well for the same effect, though its usefulness diminishes as a map mobility and split pushing tool later into the game, as you will be able to reach fewer locations in the fog safely when your team’s structures start falling.
|
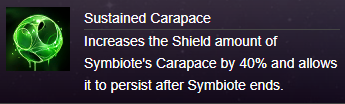
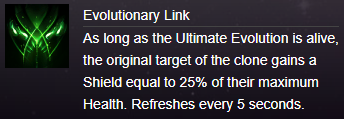
As mentioned earlier, giving up on Adrenal Overload is a hard sell, so I find that this talent only really sees play if your Symbiote target is both tanky on their own, and also doesn’t benefit heavily from the attack speed boost from the other talent. If you find yourself taking this, make sure that you won’t be missing Adrenal Overload, and probably pair it with Regenerative Microbes at 1 to maximize the extra sustain. Keep in mind that this will allow your shields to persist on targets even after you remove Symbiote, allowing you to quickly shield someone, remove Symbiote, then reapply Symbiote to a new target to start another shield. The shields, however, will still timeout at 8 seconds, so keep that in mind as well. Overall this is quite niche, but if all you need is added survivability this can work when paired with other talents and the right Symbiote target.
|
Tier Three - Level Seven
|
Hat Build
|
Mine Build
|
Situational
|
|
|
|
|
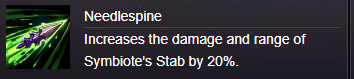
This tier doesn’t really feature much for the Hat Build, but the increased damage from Needlespine can add up over prolonged fights and the range increase can help you snipe fleeing enemies more reliably. Not the most exciting talent in the world but hey, we got Adrenal Overload last tier so it’s hard to complain.
|
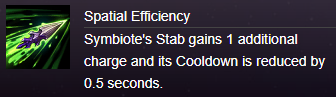
In my opinion this is the talent that makes the mine build work. The slow provided greatly impedes enemy rotations, and when used defensively can provide you enough time to escape from any enemy that might be hunting you down. Another important part of this talent is that it makes it so that you can place your mines closer together to get max value from Envenomed Nests at level 1.
|
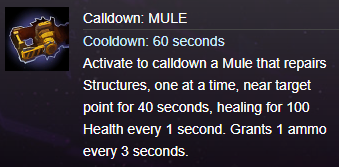
Certain maps have mechanics that rely on attrition to eventually wear down your structures (a good example is Sky Temple). MULE is a fair talent choice in the face of such objectives, as it will nullify most of the damage coming in from the map and force the enemy team to proactively push structures, while your team’s objective damage will stick. Make sure you don’t need one of the other talents more before you pick this up. The stalling power from MULE also has some great synergy with Abathur’s kit, as Abathur gets much stronger later into the game.
|
Heroic Teir - Level Ten
|
Strongly Recommended
|
For Fun
|
|
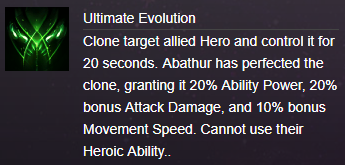
After 9 levels of being entirely reliant on the bodies of your teammates, the ability to add yourself to the fight as a (mostly) fully functional hero is a welcome change. Ultimate Evolution has a ridiculously short cooldown, and can be used as a temporary escape for Abathur’s main body in a pinch (when you make the clone, Abathur’s body quickly disappears, faster than a normal burrow, from the map and only returns when the clone expires or dies). Usually you will be cloning an assassin, so make sure you’re comfortable playing at least the base kit of your team’s assassins, but also keep in mind that sometimes the added CC and bulk from cloning a tank can help your team secure kills and stay alive. When in control of the clone, play aggressively, as the clone only provides a small amount of XP when killed and any attention the enemy team has to give you is focus they aren’t putting into your real heroes. After your clone dies, you can still Symbiote another member of your team
|
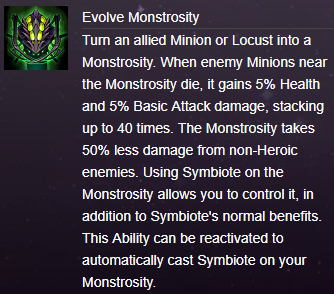
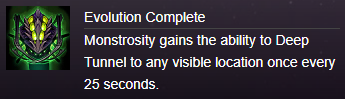
Evolve Monstrosity is a cool talent, but falls short in several ways. Left unchecked, it can easily push over structures and kill squishy heroes who come to stop it, but in most circumstances it will only really do two things: die before it becomes a threat, and distract you from helping your team while you try to pilot it with Symbiote. If you simply must try this out, get a big map, use it on a friendly minion that’s about to die, position yourself in the opposite lane, and hope the enemy team lets it get farmed up. For a build, try Regenerative Microbes, Sustained Carapace, and Networked Carapace to aid the Monstrosity’s survivability and your push potential, then follow the remainder of the Mine Build. Probably not the best idea to try this in Hero League!
|
Tier Five - Level Thirteen
|
Hat Recommended
|
Mine Build
|
Hat Situational
|
|
|
|
|
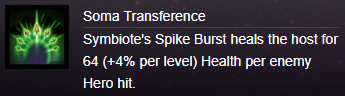
Here’s where that Pressurized Glands pickup in tier 1 starts to shine. The more heroes you can hit with your Spike Burst (W) from now on, the longer your Symbiote (Q) target is going to be able to tear into the enemy team. Use Spike Burst (W) when you can get value from the healing unless you’re sure no damage will be coming in, and try to maximize the number of targets you spray when in teamfights.
|
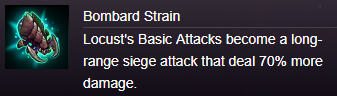
This talent turns your Locusts into tiny Siege Giants. The damage increase makes them push harder, but the range increase augments their longevity by making them fire upon structures from outside tower range. Combined with Locust Brood in the next tier you’ll start to see your split push potential really start to take off.
|
Again, not an exciting talent, but if your hat target is keeping themselves alive fine on their own and you need more damage, this talent combined with Needlespine will pump up the harass you’re capable up pretty substantially. Once again, make sure you won’t be missing the healing on Soma Transference before opting into this talent.
|
Tier Six - Level Sixteen
|
Hat Recommended
|
Mine Build
|
Hat Situational
|
|
|
|
|
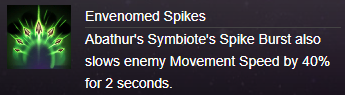
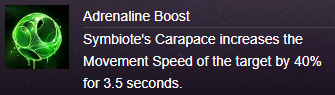
So the enemy team was probably already having trouble peeling Illidan off their carries, but after this tier it’s going to become pretty impossible. Your tier 1 talent gives this effect a pretty big range, and cutting enemy movement speed nearly in half every few seconds can make it futile for enemies to try to escape from your hat target. Simultaneously, this prevents would-be aggressors from catching up to them. This talent is exceptionally good when your team’s engage potential is stronger than your enemy team’s disengage potential
|
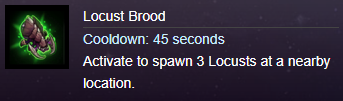
What’s better than one Locust pushing the lane your body is in? Four Locusts pushing that lane, or three pushing one lane as you slink off to start spawning a fourth in another! This talent is where you can really start focusing on being a split pushing nuisance and forcing the enemy around the map to clear up your mess (and running through several mines to get there, hopefully!). Combined with Bombard Strain an unattended Abathur push can easily secure the keeps you need to slam the door shut on your enemies. With Ballistospheres and some map-dependent practice, you can also tunnel into the enemy base and backdoor with your Locust Brood, but make sure you don’t die trying to be cheesy. Keep in mind that this talent will not be of much help to you if your team has already lost keeps, as the catapults will kill your locusts.
|
Typically, the slow on the Spike Burst (W) from Envenomed Spines is all you’ll really need to keep up with your enemies, but if the enemy composition features some really hard disengages such as Mighty Gust or Emerald Wind, this talent can help your Symbiote target reengage. This can also sometimes help you get a particularly…brave carry out of the center of the enemy team, but against coordinated teams this is unreliable and inefficient, as it only benefits a single target, rather hurting all nearby enemies.
|
Storm Tier - Level Twenty
|
Hat Recommended
|
Mine Recommended
|
Situational
|
Really Fun Build
|
|
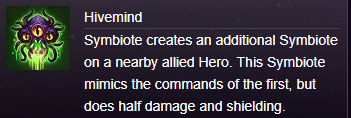
Two hats, as long as your team is grouped up. The secondary casts do less damage but still apply your talented versions of your Symbiote skills, making teamfighting through Soma Transference and Envenomed Spikes particularly challenging for enemies. At this point your team should be grouped up and pushing, or fighting to end the game, but if they seem spread you can also consider other talents in this tier.
|
Basically lets you place another body on the field that only spawns Locusts. Combined with other Locust talents you can now have five Locusts pushing the last structures your enemy controls. Or, this can be used to fake Abathur’s location against desperate teams trying to hunt you down before you bleed out their remaining keeps (couple this with a pile of mines for a nasty surprise). This can be an option with the Hat Build if your team doesn’t seem to be grouped enough for Hivemind value, but keep in mind it will lack the pressure from Bombard Strain.
|
Really only good if you’re regularly cloning tanks or bruisers like Sonya. It does provide them with a ludicrous amount of shielding over the duration, but the compositions in which this talent becomes viable are rare as most of the time you’ll be cloning a damage dealer.
|
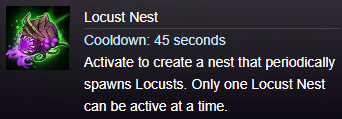
Not satisfied with split pushing relentlessly while your team fights 4v5s? Now you can essentially keep your Monstrosity alive forever. Once heroes from the enemy team arrive, just move to another lane, or if your baby got critically injured, tunnel it back to your base and heal it up before sending it back out to cause more mayhem (you can technically walk your regular Monstrosity back to base too but that takes a long time). Only do this if you’re confident you can keep a fully stacked Monstrosity alive, and that the enemy team isn’t trying to deal with it, otherwise just go Locust Nest for your own sanity.
|
Early Game:
This is where Abathur, and by extension his team, are the weakest. Abathur cannot physically provide a body towards contesting objectives, and has generally low damage output until he has a few talents picked up. Position yourself behind the wall of a top or bottom lane fort, and start sending Locusts out to pressure the lane you are in. At this point, your teammates should be covering the lanes and if not, you can use your Symbiote to on a minion to pick up exp. Abathur’s main strength is that he can empower his allies globally. Use Symbiote as much as you can to give your allies the small advantage that they need in order to score big wins. Once the first objective spawns, check if the lane opposite of the objective is clear of any split pushers or potential gankers, then Deep Tunnel into the bush next to where the minion waves clash. Your body will provide your team experience, and from here, you can either hat an allied hero to contest the objective (particularly with Hat Build), or you can set mines underneath the minion wave in another lane, then Symbiote a minion to essentially soak two lanes (better with Mine Build). Be mindful of when the objective ends, as well as any missing enemy heroes or enemy heroes with global mobility, as it doesn’t take much for your enemy to find where the Locusts are spawning and one-shot your main body if you aren’t vigilant. With this play pattern you can hopefully push through the early game as quickly as possible and get to level 10.
Mid Game:
You now have your ultimate and can contribute to fights with an actual body (assuming you took the correct ultimate). Pick your clone targets wisely, and look to use your ultimate at every objective that you can. During the down time between fights, spread mines into key chokes, and if you can do so safely, go body soak in unoccupied lanes (usually lanes where a fort is down for either team, but where the minion wave is still in a central location). You probably also have enough damage now to start meaningfully assist in ganks, so if your assassins find a lone enemy give them a hand if you aren’t otherwise occupied.
Late Game:
Depending on your build you now either have a very irritating hat target, or a very oppressive split push game. If it’s the former, continue to position out of harm’s way in lanes where your Locusts can reach buildings while you hat your primary Symbiote target. Keep in mind at this point in the game whether you are doing more good as an extra body or in symbiote form for, slows, and attack speed for your primary hat target, and plan your ultimates accordingly. If you are on the latter build, now is where you start threatening keeps or holding back enemy waves that are getting too close for comfort. Position your main body aggressively to both soak and crash Locusts into their base, and keep moving around as much as you can to leave your now desperate foes on a goose chase to stop you. This is where the Ultimate Evolution removing your body from lane can be especially tricky, as you can wait for enemies to come close, then clone someone to make it appear like you Deep Tunneled away. Most of the time, your enemies won’t bother to check a bush that doesn’t contain your main body twice, but make sure if you’re playing in a high rated game that the enemies don’t go rogue and camp your respawn, as a death in this stage of the game is quite costly.
6 Uses of Toxic Nests (Mines)
Proper use of mines is probably the biggest differentiator (besides effective body soaking) between a good Abathur and a master. Here are six ways to effectively apply this incredibly nuanced ability.
Choke Control: This is the primary way your mines will get value throughout the game. Most maps have a few key areas that have both high foot traffic and tight walls, so use this to your advantage and try to gum up as many of them as possible. This is where having map knowledge comes in huge, as well. Many map mechanics have set or at best semi-random spawn locations. A master Abathur can use this to their advantage to preemptively block of the section of the map that will be contested before the objective announcement is even made, freeing up mine stacks to be used in other ways when the objective starts in earnest.
Defensive Mines: Particularly important against stealth heroes and global movement when you are body soaking. Essentially these are Choke Control mines, but instead of guarding the objective they warn you of incoming threats to your main body’s location. These are your bread and butter for the early game where your team contribution is mostly tied up in how well you safely gather XP, but can be used later on when your aggressive positioning to take keeps could otherwise jeopardize your safety.
Wards: This use of mines is usually part of the first two, but sometimes differs enough to warrant its own classification. These mines are usually to track enemy movement, instead of stopping rotations, and as such find themselves inside of bushes, or off to the side of well-traveled areas of the map to provide vision. Also of note, mines have an arming time before they become invisible and do damage, but they still provide a small amount of vision in this state, so you can throw them in bushes you expect your foes to be waiting in to provide a jolt of instant vision. If the mine suddenly disappears before it arms, chances are there are some not-so-savory characters waiting to ambush your team at that location.
Waveclear: Abathur is capable of placing his Symbiote on minions and his Locusts in addition to allied heroes, which also gathers XP from that location while his target lives. However, Abathur’s Symbiote has generally poor AoE clear, as W’s cooldown and range is often insufficient to really wipe waves, and his Q is single target ability and does poor damage to the wave. If you set a few mines up underneath the wave you are seeking to clear, then hat a minion before they arm and detonate, you can greatly increase your waveclear at the cost of map control. Sometimes this risk can pay off, as you can essentially soak and push in two lanes while your allies roam around. The pressure from healthier allied waves crashing into enemy towers will quickly drain them of ammo if not outright destroy them. This is also useful if you need to reduce the size of large enemy waves (or merc pushes) while your team contests objectives in the mid and late game.
Mobility: This is a smaller category as it primarily applies to the Mine Build and Ballistospheres. Ordinarily, Abathur is restricted to Deep Tunneling into locations within allied vision, but because mines grant small pockets of vision they can be used as a mobility tool in the later game where allied vision starts to become scarcer. A side effect of using mines in this way is scouting potential body soak locations before you commit to a Deep Tunnel so you don’t suffer untimely deaths. The global nature of Ballistospheres makes this easier to do on the Mine Build, but other builds can do a worse version by setting mines preemptively in locations you’d like to be able to reach with your body. By setting up a mine and then moving away you can leave a location and then use Deep Tunnel to return to an area of the map outside of your current mine range.
The Cheese Choke/Cheese Bush: Smart opponents with skillshots will often be able to navigate this use but sometimes you just have to try to channel your inner Techies and explode someone. To do this, place all of your mines in a choke repeatedly, or even better, in a high traffic bush to lessen the chance someone will scout your shenanigans. Then sit back and watch as that unsuspecting Tracer walks in and loses 80% up front and panic blinks while the DoT from Envenomed Nest ticks for her last 20%. A more practical application of this type of mine usage is late game with Locust Nest. Place you nest in a bush or low visibility area, then coat it in a healthy dose of mines before leaving for another lane. Would-be hunters who think they’ve finally cornered you will often eat a hefty chunk of damage for their efforts, adding insult to injury to their time wasted as they recall back to heal. The threat of this talent increases pretty dramatically with Prolific Dispersal, as even though your mines will expire faster, you can arm more of them at a time and cover larger areas with your mine trap. Effectively setting up a large mine trap requires that your opponents do not see the arming animations (which are visible), so keep enemy vision in mind as well when attempting this usage.
Tips & Tricks:
- A more powerful, less reliable version of the duo soak strategy can be applied to soak all three lanes. Place mines under a low health wave you are not body soaking, then hat the strongest minion in the other lane where your main body is not present. As long as the mines deal the final blow on the minions in that lane, you’ll receive XP from all lanes at once, though this is often unreliable as mines rarely do enough on their own to clear and your Symbiote target usually dies before the Symbiote skills kill very many minions. Still, this can be applied if you are more concerned with crashing several waves into structures during early and mid-game objective fights.
- As if this wasn’t clear enough from the previous discussions, your mini-map is your friend when playing Abathur. You have a lot of things you can be doing while playing Abathur, but you don’t get to do any of them if you’re dead, and you’ll miss windows to be optimally effective if you can’t keep track of how many enemies are visible where on the map. Take time to glance down and check the mini-map every so often until you’ve sharpened your instincts enough to anticipate danger and these windows, and even then, a quick glance can save your life.
- Late game with Locust Brood, Abathur can take most non-boss camps by spawning Locusts near the camp then aggroing the camp to the Locusts with a Symbiote skill. His camp clear isn’t fast but it can be global, and sometimes the added merc pressure can put enough extra strain on buildings and enemy rotations to collapse them.
- Good Hat Build candidates are usually melee assassins and bruisers who benefit from Adrenal Overload, while being close enough to enemies to let Symbiote’s skills get value. Popular targets include Illidan (the most popular choice, and the added sustain from Symbiote keeps him alive while his auto-attacks heal him and reset his cooldowns for added mobility), Sonya (traditionally the bulkiest viable hat target, Whirlwind + Symbiote provides a bunch of AoE damage and sustain to Sonya, while War Paint and Wrath of the Berserker are enhanced by Adrenal Overload), Butcher (once Butcher’s Brand is on someone and he has his meat stacks, an Abathur hat can push his sustain and damage over the top), and Zeratul (in addition to being a good clone target, Symbiote is invisible as long at the hero it’s on is also invisible, leading to a bunch of surprise kills out of thin air).
- Don’t be afraid to hat your tanks, especially on Mine Build. Though tanks typically don’t benefit from having any of the bonuses from Symbiote, they’re often in the middle of fights to optimize your damage potential. Of particular note is Rexxar, since you can hat Misha then run roughshod over the enemy backline from the safety of your bear-mobile.
- Practice using common assassins before playing Abathur, so you can get the most out of Ultimate Evolution. Knowledge is power when playing Abathur, so having an understanding of map mechanic spawns and the kits of potential clone targets will take your game to the next level.
Conclusion:
Abathur is a hero that isn’t for everyone, and who can often feel overwhelming to play in high stress situations. However, there are few heroes who can offer the benefits that Abathur provides, and fewer still can completely take over the mid and late game like a well-executed Abathur. Players who love to juggle tasks and frustrate opponents, and players looking to play a high-execution character whose play pattern is unique to nearly any other character in a MOBA will find a home with everyone’s favorite bug-hat.
Want to learn more?
Try out our Heroes of the Storm Coaching Lessons!